Posts

Traveller Solo Scout Campaign: Meet the Crew - Engineer Bono

Image
https://www.youtube.com/playlist?list=PLODKhaq1htAiW4xaTp62N5zqKemSSC_Xr Engineer Bono was born on a water world. His family owned a small fishing company and Sonny spent most of his time on the company's watercraft. He enjoyed being out on the planet's seas spending most of his free time on his own - exploring new locations and tinkering with the equipment on the boats. Since he was not the first born in a large family he was not in line to own the company. After completing his education, he decided to venture into the unknown and join the Imperial Scout Service. During his first tour, his ship experienced a mishap due to a crew member of noble birth who failed in an assigned engineering task which caused a jump drive failure. The crew member attempted to pass the blame on Sonny, but ultimately failed and was drummed out of the service. This further reinforced Sonny's desire to avoid the pitfalls of Imperial society. In spite of this event, his performance was exemplary a...

Traveller Solo Scout Campaign: Meet the Crew - Captain Burnett

Image
https://www.youtube.com/playlist?list=PLODKhaq1htAiW4xaTp62N5zqKemSSC_Xr Captain Burnett was born and raised on an agricultural planet. Her family was one of the original settlers and large land owners. She was raised working and running the farm and was in line to inherit the family lands and company.  As the planet prospered it came to the attention of a number of large interplanetary agricultural corporations. They began working with the planetary government and buying the smaller family farmlands. Eventually, the majority of the planet farming was owned by the corporations and in league with the government they started pressuring the remaining largest farm families to sell out to them. One by one they fell, until only a handful of the most prominent remained - including Captain Burnett's family. Her parents were determined to resist... until they were in an air car accident. The corporations in league with the government leveraged the press to ruin her and her family's repu...

MDG MacArthur's War - KPA Surprise Attack - x3

Image
 Learning the rules - so had to do the initial KPA attack 3 times to get it right. Version 1 - traditional move/combat: https://youtu.be/rLHOS_lwYZ4 Version 2 - include overruns: https://youtu.be/CaHYMscK69o Version 3 - overruns and contested ZOCs: https://youtu.be/IdLkSLnv3UY

MDG MacArthur's War - Rules Overview

Image
 This is the start of a series on Microgame Design Group's MacArthur's War: "a simulation of the Korean War, simulating the historical campaign as well as allowing for what could have happened if MacArthur had been given the go-ahead to launch attacks against Communist China." This video provides an introduction to the game as well as an overview of the rules. https://youtu.be/OAu7fFa2xNk

OSG Library of Napoleonic Battles - Quatre Bras 5 PM French/Coalition Phases

Image
Ney tries to push the Coalition back on the right flank in order to get a buffer between the lines and Quatre Bras. The French also try to push the Coalition forces out of the woods on the left flank to remove the threat to their lines of communication. https://youtu.be/PHaSIXCxxMQ The Coalition then attempts to surround and attack the French 6th Division on the edge of the woods outside Quatre Bras. If successful this would decimate the French and put the Coalition in a strong position to retake Quatre Bras. Unfortunately for Wellington, the attack is repulsed... https://youtu.be/Sa7Cf-9B1WQ

OSG Library of Napoleonic Battles - Quatre Bras 4 PM French/Coalition Phases

Image
Ney decides to go ahead with a full assault on Quatre Bras with the bulk of his forces - except a horse artillery unit that moves into the woods to occupy the flanking British Infantry. WIll Ney succeed or should he have moved around the flanks instead? Success! And Wellington retreats to the north. https://youtu.be/dmeILxADK6k While Wellington was unceremoniously booted out of Quatre Bras, he has a constant stream of reinforcements coming the rest of the day and Ney does not. So he maintains his goal is to stay close and as more forces enter start looking for opportunities to flank the French and counter-attack when possible. Ney seems to be on the defensive now? https://youtu.be/VS6wRvMbnTE

OSG Library of Napoleonic Battles - Quatre Bras 3 PM French/Coalition Phases

Image
Kellerman wakes up and brings up the rest of his cavalry corps, and Reille's Corps surrounds and storms the Chateau... successfully! https://youtu.be/KXLiVqwuE4k Wellington concentrates at Quatre Bras with Picton, while the flanks are weakly screened. Just buying time for the reinforcements to arrive... https://youtu.be/1FoyncJLDZM

NATO 1961 Catchup to the End

Image
The last entry was Warsaw Pack M+2 and things were looking very bleak for NATO. West Berlin had fallen, The Soviets had overrun Northern Germany after paving the way with Tac Nucs. Hamburg was surrounded and isolated. The Soviets had plenty of Tactical Nuclear delivery units/HQs, while the US/UK had been decimated. So NATO had 3 choices: 1. Continue the fight with its inevitable end in sight. 2. Offer a Cease Fire, which the Soviets would probably ignore, and end up surrendering. 3. Escalate the conflict to setup the US's remaining strong point - over 1300 bombers... So the US decided to do a counterforce strike to take out the Soviet strategic Nuclear assets - a handful of ICBMs and bombers - the Golf SSB's were untouchable (!?). https://youtu.be/7WZedxjRWrk Unfortunately due to the size of the US Counter Force strike the collateral damage caused enough civilian casualties, as well as taking out the Soviet command control systems, to cause the collapse of the Soviet Union. But...

NATO 1961 M+2 WP Phase

Image
 The WP assault continues, although less tactical nucs were used and all airpower saved to defend against NATO airpower. https://youtu.be/IPzYt-sQPt4

OSG Library of Napoleonic Battles - Quatre Bras Coalition Phase

Image
Coalition Phase of Turn 1. Reinforcements moving up, will they be in time? A good bombardment result against the advancing French infantry. https://youtu.be/D4sHgHVXp_Q

OSG Library of Napoleonic Battles - Quatre Bras French Combat turn 1

Image
 Posted the turn 1 French Combat phase. The French were relatively successfully capturing a Corps Commander,  eliminating one Coalition unit, and pushing another back. Was able to illustrate a number of rules in my quest to learn the system. As I learn/understand the rules better the turns should go faster. Here is the link to the video: https://youtu.be/7q6lZky_9bI Here is the situation at the end of the French player phase:

MDG NATO 1961 AAR - M+2 Situation Discussion

Image
 In preparation for M+2/next turn following the WP Attack, I discuss a number of topics: 1. End game triggers 2. Victory Point Calculations 3. Short term strategy 4. Long term/escalation strategy Here is the link to the video: https://youtu.be/NAdhqwHG3HA Here is a picture showing the start of the siege of Hamburg:

OSG Library of Napoleonic Battles - the journey begins...

Image
OSG's Library of Napoleonic Battles - it's time to learn the system. I picked up a few intro games (single battles) over the past few years but never played any of them. A few months ago I was looking at/reminiscing over the old SPI Napoleon's Last Battles. I reviewed the Decision Games remakes - I had actually made a VASSAL module for them of the 2nd Edition a year ago. This lead me to OSG and Kevin Zucker and I decided if I was going to get into the series I should start with the 'latest'. https://napoleongames.com/pages/library-of-napoleonic-battles This was about the end of last year and OSG was having a sale and I picked up Napoleon's Last Gamble (NLG - Waterloo Battles) and Napoleon against Russia (NaR). This should be enough battles combined with my 2 intro battles to keep me busy. I also had invested in a number of computer Napoleonic Battles from JTS/WDS which I may start playing in parallel - although these are at a more tactical level.  https://wargam...

MDG NATO 1961 AAR - NATO Response

Image
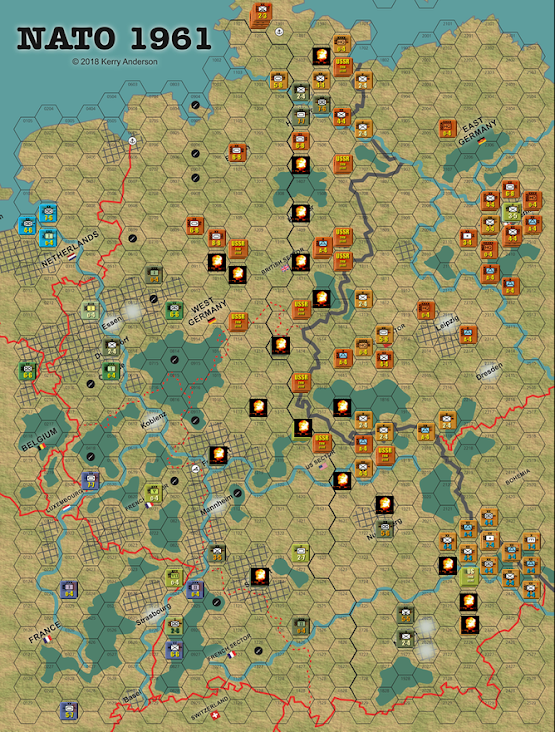
Finally back to post the NATO response to Warsaw Pact Tactical Nuclear attack. While NATO forces were decimated in the initial WP attack, they were able to blunt most of the WP spearheads with their Tactical Nuclear response. This is an entirely different type of warfare than the typical conventional battle. Instead of massing forces and attempting to defeat the enemy in ground combat - now it is getting in range and decimating the enemy w/nuclear weapons. Initially, the priority target is the enemy's tactical nuclear delivery means, but as seen in this turn it starts shifting to attempting to break the will of the enemy through civilian casualties. From there it is a small step to escalating to all out nuclear warfare. Here are the YouTube links for the NATO phase: Part 1: https://youtu.be/LakR1BePuNI Part 2: https://youtu.be/zrCbafE-V40 Here is the map at the end of the turn. The front lines are thin on units with the tactical nuclear exchange. At the beginning of the next turn b...

MDG NATO 1961 AAR - WW3 Begins w/Soviet Tactical Nucs

Image
 And the war begins with a true bang - Soviet Tactical Nuc missiles and Air Strikes across West Germany.  This is a different type of war than conventional. In this environment, combat units cannot concentrate for standard attacks and become targets themselves - instead, they move close enough to their target, but not too close, and attempt to deliver a nuc blow that prevents retaliation. My current play thru is a somewhat unique case with starting the war with tac nucs, NATO has no air yet, and all US/UK units/HQs except 1 starting out of Tac Nuc range. The Soviets can selectively move forward and try to destroy (all) the US/UK units in range before they can respond.  If Tac Nucs started after a turn or more of conventional war then it would probably be an even exchange and therefore maybe cause players to reconsider before starting. But if a side could orchestrate the current situation - surprise/mainly unanswered tac nuc attack it could be tempting. So the priorities o...

MDG NATO 1961 AAR Resume - Previously on NATO 61...

Image
I am resuming a playthru I started a little over a year ago of Microgame Design Group's NATO 1961 game: http://microgamedesigngroup.com/N61.html From the game's website: "NATO 1961 is a simulation of the potential for war in Germany, covering events that could have led to World War Three. Players assume the roles of President John F. Kennedy and the NATO powers or Soviet Premier Nikita Khrushchev and the Warsaw Pact general staffs. Confronted with the crisis, players can manage the conflict at a limited level or escalate it to a full-out nuclear war between the Superpowers." The game uses the escalation system that is used in MDG/Kerry Anderson's other games during the Cold War - Korea and Cuban Missile Crisis. The system adds 2 more developed phases/mechanics normally not explored in detail in other WW3 games.  The first is an extensive pre-war period starting with the crisis in Berlin in early 1961. East German refugees were streaming into the west through West ...

Buffalo Wings II - Online/PBEM Bomber Chase T4 - I downed a Soviet Bomber, but...

Image
 I downed my first Soviet Bomber! Unfortunately, I did not use an ideal method. I collided with it... At the beginning of the turn, I thought I would have to go past the rear bombers because of speed and follow the lead, or I needed to pop up to stay behind them and do another diving attack next turn. But looking at my movement options I found I was just slow enough to stay behind a bomber and at 0 range in their blind spot and my max firepower. Collisions never happen that much anyway... I was wrong. Luckily my other flight member dodged a collision with his range 0 bomber. I was told I successfully bailed out, so I can fly another bullet plane... err Fiat again. Message from JD: "Art collides with bomber 7 and will have to bail out. Both Fiat 2 and Bomber 7 destroyed. Short game for Art as he demonstrates one reason for not going for range zero shots and tempting fate!"

JTS/WDS Bulge 44 - Starter Scenario AAR Turn 13 & 14 - The End

Image
Here are the last 2 turns of the scenario on YouTube: https://youtu.be/3gScZD2QyGU Both turns were relatively static - mainly exchanging fire. But ultimately that was enough for a German major victory. End of turn 13 - mainly focused on securing current VP hexes from US counterattack and causing more casualties to get over the major victory VP threshold. The artillery was set up now and could contribute to the fire on the final VP hex. About 5 points short at the end of the turn.  Turn 14 and the biggest news was the Infantry north of the final VP hex undisrupted so after the Artillery and Engineer fire was able to assault again - this time causing 166 US casualties. This was enough to put the VP count above the major victory level by a healthy margin. After the German National Anthem played, then I was able to see ALL the US forces. Then I realized I only won because of US/AI incompetence - against a human opponent things would have been different...

JTS/WDS Bulge 44 - Starter Scenario AAR Turn 11 & 12

Image
Not a lot of movement as we come to the end of the scenario. Setting up for the final assault on the last VP hex. Here is the link to the YouTube video of turns 11 and 12: https://youtu.be/VwC9JKKyjXI End of turn 11 - move German Infantry and a handful of Panzers to the Woods north of the final VP hex. Both US units in the final VP town were disrupted by fire so I decided to take chance and assault them with infantry and panzers in the woods to the north. While they did not take the hex the casualties they caused were shocking. Probably due to both US units being disrupted and the infantry unit still in travel mode. But the German infantry was disrupted also so no follow-on assault is possible until it recovers. Therefore I take another chance and move the Div HQ forward to try to increase the odds. End of turn 12: And thanks to the US casualties from the assault, the Germans are at a minor victory level. Maybe the German's just need to hold on until the end...

JTS/WDS Bulge 44 - Starter Scenario AAR Turn 10

Image
0600 Turn - The main focus is setting up to capture the remaining VP hex while holding the line everywhere else. Beyond the now 3 US Inf Bns lurking in the southern woods, a new one appeared to the west of the remaining VP town. Not good for my upcoming assault. YouTube: https://youtu.be/ZuQHpdfIBrY End of US turn 10 positions