Posts

Showing posts from January, 2022

JTS/WDS Bulge 44 - Starter Scenario AAR Turn 8

Image
Trying to get more experience posting to YouTube - although I messed up the audio. Turn 8 is posted: https://youtu.be/YyBw_WCtNsA The analysis is in the video...

JTS/WDS Bulge 44 - Starter Scenario AAR Turn 7

Image
Things are starting to slow down - but the game is only at the halfway point. Still concerned about the number of US Inf Bn on the board. Since I can't break down my Bns, I only have 6 Inf units and 1 Eng Bn to cover all the ground and VP locations. In the north, things are a bit static. Just trying to keep the US units engaged and disrupted if possible. So exchange of fire and an assault against a dispersed stack of Inf. It looks like in the US turn they pulled 1 Inf Bn off the line and replaced them with Greyhounds. Where is the Inf Bn going? The main event is in the US rear. I had to leave one of the Inf Bn behind to screen Blejaff/50VP from the 2 US Inf Bn to the east. Then sent the Hetzers and the other Inf Bn up the road to try to clear a path to reinforce the attack on the final 150VP hex. Finally, the Eng Bn are trying to finish off the US Art Bn on the road to close up on the 150VP Hex. But then I noticed something about the road the Engineers were on... the US Engineers h

VASSAL Module - WDG Nubia

Image
Finally finished version 1 of the VASSAL Module for White Dog Games Nubia. https://www.whitedoggames.com/nubia "Nubia remained an island of peace in a sea of violent jihad. But in 1171, dynastic disputes in Arab-occupied Egypt spilled over into medieval Nubia – setting the stage for its violent decline and fall (1172-1504). NUBIA is a solitaire strategy game based on that conflict, designed by R. Ben Madison and published by White Dog Games." Below is a partial image of the map/module with the initial setup:

Buffalo Wings II - Online/PBEM Scenario Start

Image
Just joined another online/PBEM game of Buffalo Wings II refereed by the man himself, JD Webster. Total of 6 relatively new players so a learning scenario. The scenario is 6 Finnish Fiat G.50's chasing a group of 9 Soviet SB2 bombers that just attacked their base. The players are flying the 6 Fiats chasing the SB2's flown by JD. While it may seem like a turkey shoot - my I-16 in a previous game was shot down by defensive fire of these same type of bombers.  In the image below my leader (F1-Lead) has moved and as one of his wingmen, I am matching his move. F3 is the other member of our flight and has not moved. F4-Lead is part of the other flight of 3 Fiats, the other 2 are off-map to the NW. Need to do this run not too fast and overshoot, or too slow and get chewed up in the defensive fire. Just going to follow the lead for now.

JTS/WDS Bulge 44 - Starter Scenario AAR Turn 6

Image
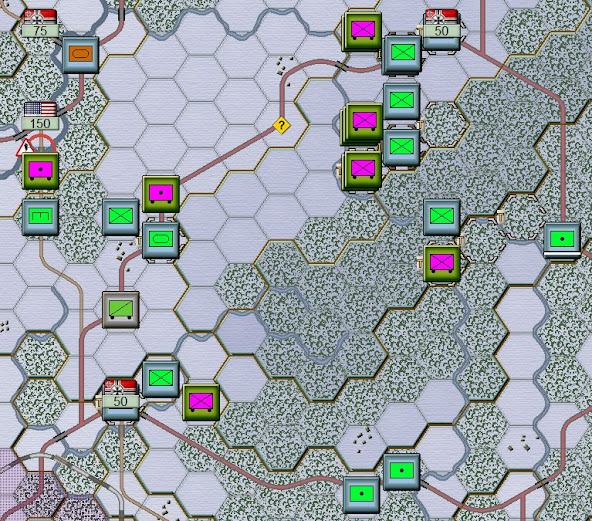
Been offline busy but back again now. Here is turn 6 of the PC Bulge starter scenario. I have made great geographic progress, but as you will see there are so many US Inf Bns popping up. With only 6 Inf units myself, I am feeling really outnumbered. Also, only halfway thru the game and I have all the VP hexes except one. It will be a bear to capture but after I do am I supposed to go over to the defense and let all the US Inf run freely? Going to probably slow down the push for the last VP hex and see if I can grind down the US. In the south/rear, the German's finished off the broken US Inf Bn and then assumed defensive positions around the VP hex Blejalf to see what the 2 US Inf Bns do. The Engineers moved up the road to the last major VM hex Schonberg to see what was on the road - a US Art Bn in travel mode. The Stug Bn moved into the woods to the NE of the VP hex to seal if off from reinforcements. Finally, the Hetzer's occupied the abandoned trenches on the main diagonal ro

ACDC 2022 Convention

Image
 Got to participate in 2 learn to play games on Friday. The first was LnL Pacific scenario Raid on Taivu.  Unfortunately, I did not do a save game but below is the map. We only got thru a few turns since I was learning the game. In the end, my Raiders had got off the beach and across the first road and right before the Bldg/Huts in the top left corner. There was one more map to the north and 7 turns left when time ran out - but great fun. The second game I got to play to learn was World at War 85. Again we got thru part of the turns before time ran out. First I had a column of Czech T-55am coming down from the far-right northern road. This initially drew the defenders Leopards and an ATGM unit. I started w/10 platoons - ended with 3 platoons while only eliminating one Leopard platoon. Not looking good. But then my Inf/Eng column came down the field road (limited visibility for defenders). The remaining Leopards shifting to block this road, but maybe a bit too close. My Inf/Enf units we

Starfire Saga #4 - ISW1 - The Federation Strikes

Image
The loss of the Nelson was a blow to TFN morale but also focused the fleet's resolve. The data gathered about the enemy ships and weapons from the battle at Orphichon was quickly analyzed. The focus of research was on counteracting the Tractor capability and developing a multi-ship coordinated fire capability - data link. In the meantime, while the Khanate didn't detect the hidden warp point back to Federation space, they were probably looking for it. It was the only way to explain where the Terran squadron came from.  Therefore the TFN HQ planned an immediate probe/attack in a different direction from VX-134 - the system identified as Kompakutor in the captured Khanate astrogation database:   After the experience at Orphichon, the TFN formed a squadron of all available CL's and new construction DD's. It was designated TF 232 in VX-134 under the command of Rear Admiral Hara Tadioshi - 3 CL's and 4 of the new Brazwell class DD's. And they were all itching for a f

Starfire Saga #3 - ISW1 - Battle of Orphichon

Image
Back again - The Starfire Saga - ISW 1. This is also in response to something I heard at the end of the of a Grogcast Episode - "just get the game out and play it." So the dance between the nascent TFN and KON continues… Mix and match on the Scenario and Rules. Using the Gorm-Khanate 2nd edition updates to the rules - biggest for this scenario is using Engine Rooms now instead of individual Ion Engines. A number of new systems are included that now matches better with the later Starfire 3rd Edition Rules. Therefore I am using The Stars at War scenario ship list and the updated ship specs from the 3rd edition rules. But I am still using the setup from the original 2nd Ed scenario which starts at the Tactical level vs. the System level. The KON has some definite technology advantages in this scenario - specifically Datalink, Force Beams, and Tractors. Datalink allows 3 ships to form a group and fire together - better chance to inflict more damage and possibly overwhelm the targ

Starfire Saga #2 - return to VX-134

Image
Capt 'Lucky' Howie limps back to Epsilon Eridani with critical information for the Terran Federation - there is an aggressive/hostile alien race with at least similar technology 3 Warp Points from the Sol system and Earth. Either the TFN can fortify the Epsilon Eridani system and wait for the inevitable attack or they can carry out a preemptive 'offensive recon' mission. The decision is made to return to VX-134 but this time ready for a fight. The Discovery is refitted with 2 new dual purpose Gun/Missile launchers (W) in the place of its dedicated Gun (G) and Missile (R) launchers. These new launchers are able to fire either unguided gun shells for close range or standard missiles for long range combat. Discovery is joined by another converted Frigate (FF) class survey ship the Outreach and also a new Destroyer (DD) class warship the Napoleon. Capt. Anderson will command the newly formed Task Force 101 from the DD 'Nappy'. Meanwhile on the other side of the Warp

JTS/WDS Bulge 44 - Starter Scenario AAR Turn 5 (video)

Image
Changing over to doing turns by video on YouTube - view it here: My inexperience with the system may be starting to show. Maybe a bit overaggressive and not doing a good job of protecting my lines of supply/communication.  At the end of the turn here are the positions:

JTS/WDS Bulge 44 - Starter Scenario AAR Turn 4

Image
Turn 4 In the north, the goal of the 2 German Regiments has shifted to keeping all the US troops engaged to hopefully allow the southern regiment to break through into the rear and the big VP hexes. Most US units are disrupted so the Germans assault/maneuver to try to isolate the US units. The Stug unit makes a run on the northern road for the rear VP hexes and the results of this dash will be in the next image.

Command Modern Operations - Submarine Tutorial 1.3 (part 1)

Image
Trying YouTube next. This is a brief video I did of CMO Sub Tutorial 1.3. From the Scenario brief: Welcome to Basic Submarine Operations 1.3 In this scenario, you will have command of a Russian diesel-electric attack submarine (SS or SSK). Using pop-up messages, you will be guided through the following topics: ·         Diesel-Electric Propulsion ·         Snorkelling ·         Loading specific weapons to a mount ·         Submarine-launched anti-ship missiles ·         Submarines equipped with surface-to-air missiles ·         Submarine-launched cruise missiles Your mission is to destroy a merchant ship with missiles, conduct a land strike with cruise missiles, and destroy an aircraft with surface-to-air missiles. You will have support from a friendly maritime patrol aircraft that will not be under your control.